출처:http://www.javalobby.org/java/forums/t18678.html
On the verge of another Eclipse milestone release (3.1 M7 for this Friday), I thought it would be good to share my experiences with managing multiple Eclipse installs with everyone so you could try out the new Eclipse installations, without ruining your day by accidentally breaking your IDE, and being unable to get any work done.
First, let me say that you should *never* update Eclipse by just unzipping over another installation. At a bare minimum if you are just overwriting another Eclipse installation like this, you should first go through and delete the features, plugins and configuration folders. If you are interested, however, I'm going to explain a better way in today's tip.
The first step to managing an Eclipse installation is to understand the different components that Eclipse can broken into.
Each of these items can be managed independently of each other - and it is usually beneficial to do so. Here is how:
Installations:
Eclipse installations can be put anywhere on your filesystem - I typically put them in c:\eclipse-installations\ . So, for instance, I will download Eclipse M7 tomorrow, extract it to c:\eclipse-installations\ and then rename the new eclipse folder the produced by the extraction to eclipse_31_M7 - so my installation folder may look like this:
c:\eclipse_installations\eclipse_31_M7\
c:\eclipse_installations\eclipse_M6\
c:\eclipse_installations\eclipse_bleeding_edge\
c:\eclipse_installations\eclipse_30\
That is it for Eclipse installations. Each of those Eclipse installations can be run independently (and can be started concurrently I might add). Don't do that yet, we still have some work to do!
Extensions:
The default way to install plug-ins is to simply drop the plugin into the [ECLIPSE_HOME]/plugins folder. The only problem with this is that those plug-ins have to be dropped into each installation's 'plugins' folder. So, for instance, for the sysdeo plugin given the above example, I would have this:
c:\eclipse_installations\eclipse_31_M7\com.sysdeo.eclipse.tomcat_3.0.0\
c:\eclipse_installations\eclipse_M6\com.sysdeo.eclipse.tomcat_3.0.0\
c:\eclipse_installations\eclipse_bleeding_edge\com.sysdeo.eclipse.tomcat_3.0.0\
c:\eclipse_installations\eclipse_30\com.sysdeo.eclipse.tomcat_3.0.0\
This actually isn't a serious problem, because the preferences for the plugin are set in your workspaces folder, which is different from the extension installation. It can be a hassle to have to copy these files around. Eclipse does have a little-known-feature that allows for an installation to be extended by an external directory structure. The complete process is described here by Matthew Conway ( Update: Matt was kind enough to email me and tell me that I goofed and misspelled his last name ;)): http://simplygenius.com/geekblog/2005/04/08/1112982083849.html
To paraphrase, you can construct a pseudo Eclipse installation in a separate location; we'll call it c:\eclipse_extensions , and then install all of your third-party plug-ins there. To create it, follow these steps:
- Create an eclipse folder (
c:\eclipse_extensions\eclipse) - Create an eclipse features folder (
c:\eclipse_extensions\eclipse\features) - Create an eclipse plugin folder (
c:\eclipse_extensions\eclipse\plugins- Create an extension descriptor file, and fill it with these contents (ala the SimplyGenius Website) (
c:\eclipse_extensions\eclipse\.eclipseextension):name=My Eclipse Configuration id=my.eclipse.configuration version=1.0.0
Note that the values of these properties aren't strictly that important, but leaving them to the values seen above works just fine. - Create an extension descriptor file, and fill it with these contents (ala the SimplyGenius Website) (
Then, simply install any plug-ins or features in to that extensions path, as opposed to into Eclipse directly. So, again, for Sysdeo, you might have:
c:\eclipse_extensions\eclipse\plugins\com.sysdeo.eclipse.tomcat_3.0.0\
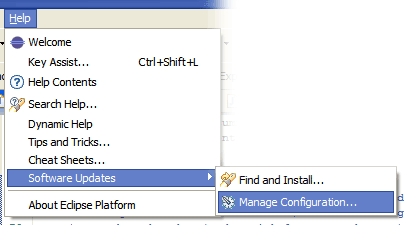
The only remaining step will be to point your unique Eclipse installations to that extension location on first boot. To get an Eclipse installation to load an external extension location - Go to Help->Software Updates->Manage Configuration... :

... and then right-click and say 'Add Extension Location', giving Eclipse the path: c:\eclipse_extensions\eclipse .

( Note: Just pretend that 'eclipse_experimental' in the above picture is actually 'eclipse_installations').
It will ask you if you wish to reboot - for now just say no, and close Eclipse manually. That's it, now your Eclipse installation will load all plugins and features in that extension folder as if they were in its own plugins folder.
Workspaces
Workspaces are the last component I want to discuss - and creating new workspaces is as simple as changing your shortcut to Eclipse (or your startup-script). Workspaces are where you keep the code, and are also where you save your preferences (Java Editor settings, code formatting settings, colors, fonts, key mappings, etc). I'll continue the Windows theme here. First, create a workspace folder, such as c:\eclipse-workspaces\ . Next, create a shortcut to one of your Eclipse installations that references a subfolder in this new folder as part of the -data argument. So, rather than having c:\eclipse_installations\eclipse_31_M7\eclipse.exe as your startup command in your shortcut (or startup script or whatever), you would have C:\eclipse_installations\eclipse_31_M7\eclipse.exe -data c:\eclipse-workspaces\ workspace1 . Actually, while we're at it, we can make the memory allocation more reasonable. Here are three different startups with different installations and different workspaces that all use the same extensions folder (note, I have put these on multiple lines to make them easier to read):
c:\eclipse_installations\eclipse_31_M7\eclipse.exe
  -data c:\eclipse-workspaces\workspace1
  -vmargs -Xms256M -Xmx256M

c:\eclipse_installations\eclipse_30\eclipse.exe
  -data c:\eclipse-workspaces\workspace2
  -vmargs -Xms128M -Xmx256M

c:\eclipse_installations\eclipse_bleeding_edge\eclipse.exe
  -data c:\eclipse-workspaces\workspace3
  -vmargs -Xms256M -Xmx256M

c:\eclipse_installations\eclipse_bleeding_edge\eclipse.exe
  -data c:\eclipse-workspaces\workspace1
  -vmargs -Xms256M -Xmx256M
In the above example, workspace1 is running under Eclipse 3.1 M7, workspace2 is running under Eclipse 3.0, and workspace3 is running under some bleeding edge integration build. Finally, notice that I have also made another shortcut to workspace1 running under a completely different installation.
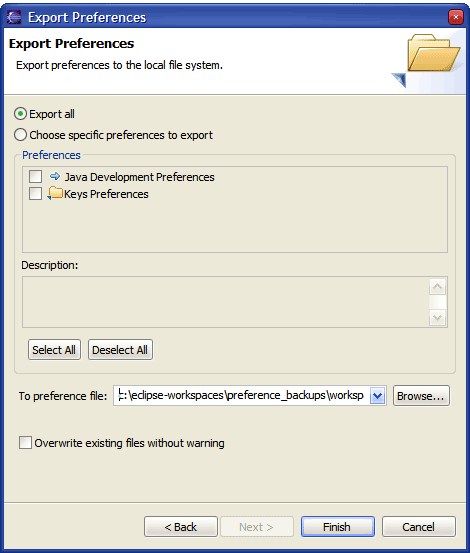
One final thing to note - a lot of users feel frustrated because their workspace preferences can't be shared from one workspace to another transparently (for instance, I use the same code formatter for multiple workspaces). There are some technical reasons why this isn't typically done, but there are workarounds. You can always copy the workspace folder and rename it to create another workspace. Alternatively, you can copy the .metadeta folder under one workspace, and paste it into another. These are 'black magic' ways to do this however, so do so at your own risk. The most appropriate way is to go to a particular workspace, and perform a preferences export. You can do this in 3.1 milestone builds by going to File->Export and selecting preferences - then select what preferences you want to export, and where you want to export them (e.g. c:\eclipse-workspaces\preference_backups\workspace_preferences_05-11-05.epf).

Then you just need to import to your other workspaces the same way. Voila!
Until next time,
